Prerequisites
-
Regardless of the chosen Distro (or if you don't want to use a Distro), you must install NeoVim first.
Without using distros
-
Tutorial .
-
Nice, cool.
-
I prefer without distros, I think.
Comparisons
-
Comparison between LunarVim, AstroVim, NvChad and LazyVim .
-
My impressions:
-
Overall, all cool.
-
LazyVim and LunarVim have a nice initial screen with file creation options, etc.
-
Overall there were differences in installing new plugins, where LazyVim is the simplest in this regard.
-
-
Kickstart.nvim
-
About :
-
"Not a 'distribution', but a template. It doesn't install plugins for you."
-
It's a Neovim configuration focused on simplicity and a quick start for users who want to use Neovim effectively without much configuration effort. Ideal for beginners who want something functional out of the box but customizable later.
-
Minimal and quick configuration :
-
Kickstart aims to provide an initial configuration that lets you start using Neovim with basic editor functionality.
-
-
Focus on the basics :
-
Includes only essential plugins, like telescope.nvim for file navigation and treesitter for improved code syntax.
-
-
Easy to customize :
-
Although kickstart is an initial config, it allows you to modify and add plugins easily as needed.
-
-
Zero Complexity :
-
The focus is to be as simple as possible, making it ideal for people starting with Neovim who want a good base to expand.
-
-
"Why is the kickstart
init.luaa single file? Wouldn't it make sense to split it into multiple files?"-
The main purpose of kickstart is to serve as a teaching tool and a reference configuration that someone can easily
git cloneas a basis for their own. As you learn Neovim and Lua, you might splitinit.luainto smaller parts. A fork that does this while keeping functionality is available:
-
-
-
Requirements :
-
FAQ .
-
Windows:
-
With Chocolatey:
-
choco install -y neovim git ripgrep wget fd unzip gzip mingw make
-
-
-
-
Installation :
-
Windows:
-
git clone https://github.com/nvim-lua/kickstart.nvim.git $HOME\AppData\Local\nvim.
-
-
Linux and Mac:
-
git clone https://github.com/nvim-lua/kickstart.nvim.git ~/.config/nvim
-
-
After installing, it should look like this:
-
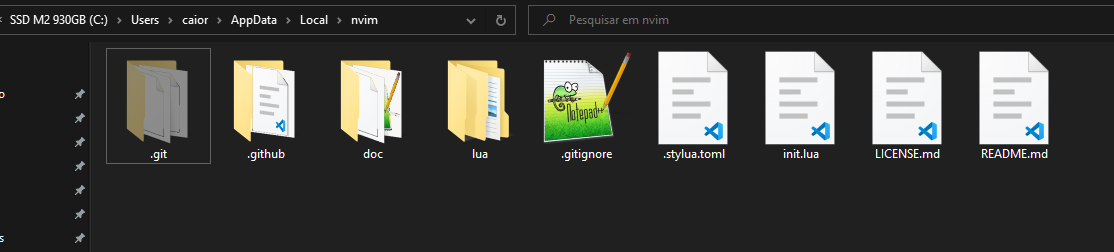 .
.
-
-
How nvim looks after installing:
-
 .
.
-
I'm using WezTerm, but it looks like a generic CMD at the moment. The visuals came from Kickstart.
-
-
-
Configuring :
-
Run U to update everything that needs updating.
-
It's super useful to run ? to learn the new interface.
-
-
Theme :
NvChad
-
About :
-
It's a pre-configured Neovim setup that uses the
lazy.nvimpackage manager. -
Modular Structure :
-
NvChad organizes configuration in modules, allowing features to be toggled on/off easily.
-
-
Pre-configured plugins :
-
Many useful plugins like telescope.nvim and nvim-tree.lua are already configured.
-
-
Modern Interface :
-
The default theme and visuals are based on Lush , which allows dynamic theme creation for Neovim.
-
-
Plugin management :
-
Uses Packer.nvim for plugin management, making installation and updates easier.
-
-
Focus on Performance :
-
One of NvChad's main concerns is keeping the editor fast and light even with many plugins.
-
-
Basic file structure:
-
lua/core/: Contains NvChad core modules like shortcuts and general settings. -
lua/custom/: Where you customize without affecting original files. -
plugins.lua: Defines and manages plugins.
-
-
-
Installation :
-
Windows:
-
git clone https://github.com/NvChad/NvChad $HOME\AppData\Local\nvim --depth 1.
-
-
Linux and Mac:
-
git clone https://github.com/NvChad/NvChad ~/.config/nvim --depth 1.
-
-
After installing, it should look like this:
-
 .
.
-
-
-
My experience :
-
After installing NvChad "correctly" and opening nvim, the example message didn't appear.
-
Running
:help checkhealthgave a warning that I didn't haveinit.luain the config directory$HOME\AppData\Local\nvim.
-
-
-
It uses the
JetBrainsMono Nerd Font.
-
LazyVim
-
"Great for users who want a highly optimized setup focused on performance, with lazy loading for efficiency.".
LunarVim
-
.
AstroVim
-
.